Showing posts with label easy diy. Show all posts

Tuesday, July 9, 2013

Quick Homemade Green Tea Soy Latte from Teabags

Hello all. I just got back from our Florida/Disney Vacation, so there has been a lack of blogs. Let's just jump right into blogging with a great morning pick-me-up!

Green Tea Latte!
I made mine a soy latte, but you can use regular milk if you'd prefer.

Ingredients:
-Green tea bag
-1/2 cup boiling water
-1 cup vanilla soy milk
- whip cream
-blender
1. Fill a small pot up with 1/2cup water and with the teabag in the water, bring to a boil for about five minutes. You may need to add a little more water in case of rapid evaporation.

2. Heat the milk in another pot but don't boil.

3. Once the tea has finished brewing, pour into a blender, along with the heated milk. I use vanilla soy milk, the vanilla add a nice sweetness to the tea.

4. While still hot, blend together until frothy. You can also add honey, sugar, or vanilla extract. Since I used vanilla soy milk I didn't add anything else. It also is good with melon flavoring.

5. pour into a glass or mug and top with whip cream.


This is a lovely treat, and after spending so much money on vacation, I didn't want to run out to Starbucks. Making this at home is great and so simple!


Enjoy<3

Tuesday, June 25, 2013

Decorated Makeup Drawer Box: Revamp Your Storage!


As we are getting ready for summer, and summer vacations, It's always fun to clean out everything. I like to clean everything out with each season, instead of just "spring cleaning". I clean my closet and storage beds and move all the furniture and clean out all the drawers in the house. When it came down to my makeup, I REALLY needed some major cleaning. I also wanted to make my box look less tacky and make it match my bedroom more. The room is a pale pine green, pale blue, cream, and dark brown. When I saw the green paper I knew exactly what I was going to do with it! Lets get to it:


 Materials:
Cleaning Supplies (my makeup and makeup box needed cleaning bad!)
Scissors
Glue
Craft Paper, I used scrapbooking paper
Plastic Drawer Organizer

 Here is a lovely before shot..

Clean EVERYTHING!

 It's always nice to have nice clean things to work with, since you're about to make the box all pretty, your make up should be nice and clean and pretty too!

 Hello my name is Paige and I have a makeup fascination.


 Okay, once everything is clean, lets start making the drawers pretty!

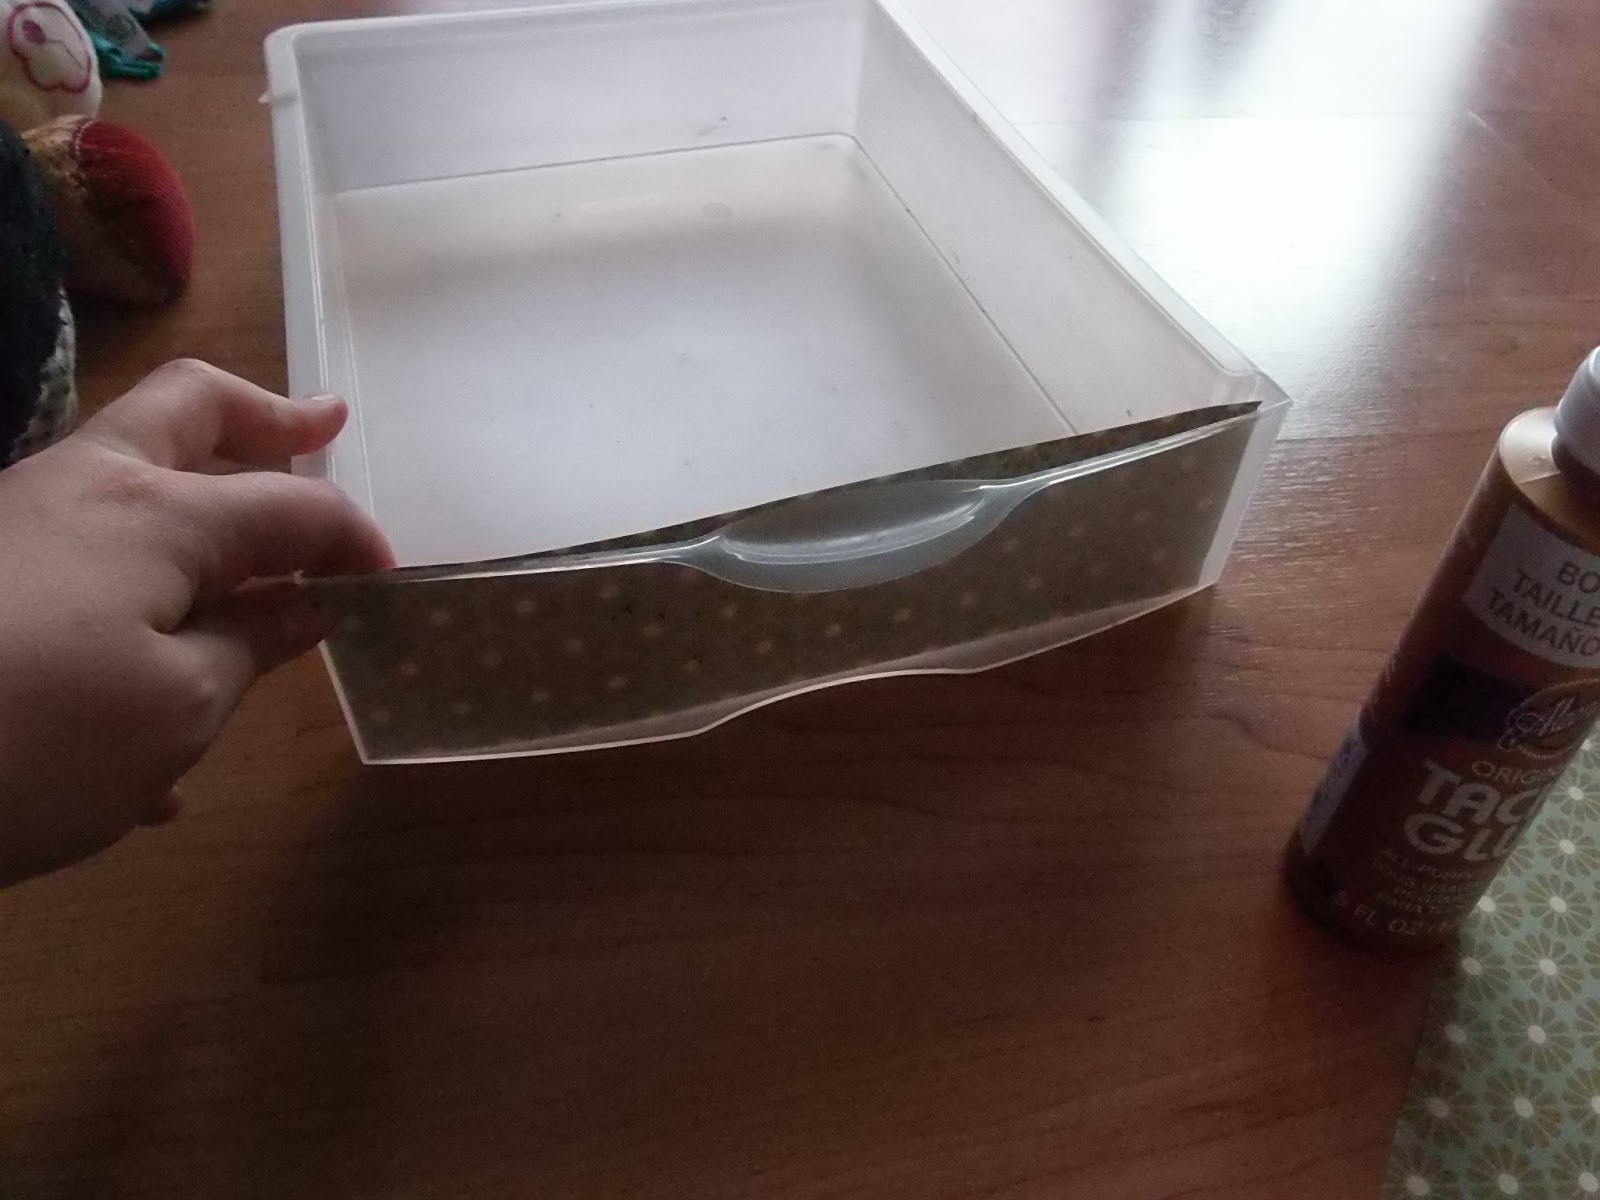
 Cut strips of paper to fit BEHIND-
-The front of the drawer.

  Glue around the edges on the FRONT of the paper so you can glue BEHIND the front of the drawer. Hot glue would have been a lot quicker, just a helpful tip.

 Hold in place until kind of secure.

 Because I wasn't using a quick drying glue, I used some clothes pins to hold the paper in place for the glue to dry

 Do this to the front and the back panels of each drawer

 Now go ahead and start organizing your makeup. I had one drawer for lips- lipstick, gloss, chapstick, lip moisturizer, etc. one drawer for face- blush, foundation, concealer, powders, bronzer. and one for eyes- eyeshadow, eyeliner, mascara, eye gels, eye whatevers.

 and here is the finished one! it looks so much better than what it did, you can still see the glue (it wasn't completely dry yet but I was ready to take pictures!) and all my makeup brushes I put into a different container, which I will post later!

Wednesday, May 22, 2013

Paper Party Lantern Craft

I recently had a small "Luau Party" of sorts.. that I never thought to get a picture of. I did however get few pictures of the awesome lanterns I made spur of the moment. I was originally going to have these sitting out on a side table but when my almost-two-year-old decided she was in love with them, they needed to go somewhere a bit higher out of her reach.
 
Please excuse the popcorn ceiling and brown wood and powdered blue and very off white door. We just moved in a couple weeks ago and haven't gotten around to painting anything. That will be in another post, it will be too shocking of a change for it to not be!

Anyway, back to the lanterns. Now I had done this craft wayyy back in kindergarten, so I am pretty proud of myself for even remembering how to do it. Since this is a easy craft, it would be perfect for a kids craft or a classroom party craft or even as a game for kids to do at a birthday party.

What you need are:
Cardstock or construction paper
Scissors
Glue
Hole Punch
Ribbon or string (if you intend on hanging them)

Step one! Gather materials. Obviously.

Step two! Fold your Piece of paper in half vertically. Like a take-out menu. So LONG not SHORT


Step three! Start making  about one inch snips all the way up the paper on the folded side, leaveing about an inch to an inch and a half of room at the top. That is where you will glue the two sides together. So do not cut all the way off the paper. Or you'll just have strips of paper ;]


Fourth step! Cut through out the paper. They don't have to be even lines, you can't completely tell once the lantern is completely assembled.


Step five! Open up your folded paper and on one side dab a couple dots of glue.

Fold over the other side and hold in place until the glue is either dried or tacky enough to hold itself.

And there you have it, a lantern! You can push down a little on the top while its standing to give it a more bulky look if you prefer the fat lanterns.


Now I was originally just going to have them standing with tea candles in side, but since I needed to move them out of the way, I punched two holes on opposite sides of the lantern and tide a piece of skinny ribbon between both to give it a handle for hanging.


oh I cannot wait to paint these walls...


peaceful crafting =] -