Tuesday, February 24, 2015

House & Errands Outfit - SAHM Lookbook pt 2

Welcome back to my Stay At Home Mom Lookbook!

Here's part two!

Today's outfit consists of a light wash denim button down. It's a bit slouchy because it is about one or two sizes too large.
Black leggings...again
A super soft knit infinity scarf that I actually arm-knitted myself! (Tutorial someday perhaps?)
A thick gold watch and bright pink lipstick really make this outfit have a bit of sophisticated pop in this otherwise casual outfit. 

Definitely a favorite outfit of mine!


Monday, February 23, 2015

Casual Mom "around the house" Outfit - SAHM Lookbook pt 1

Lately I've been in a very no-idea-what-to-wear mood. Instead of staring at my overly stuffed closet that I don't have time to choose outfits from, I'm making a lookbook of outfits I can easily look back at.

It's also nice for you fellow moms who don't seem to have the time to piece together an outfit every single day. I know it's hard for me while my 3yr old is controlling my time schedule! Hopefully this makes that effort a little less time consuming.


Today's outfit consist of a deep indigo sweater I LOVE. It's large and comfy to just throw on with it's slouchy turtleneck and half sleeves.
Black thick leggings (because they are a stay at home mom's best friend)
And accessorizing with a long necklace and nude pink lips to help make this outfit look more put together than it actually is. ;)


I love outfits that look like they actually took a lot of thought into putting them together but really it's just comfy go-to clothes!

Saturday, January 31, 2015

Detox Water - Lemon, Cucumber, Mint Water

So I have a new favorite refreshing drink. Cucumber water. I’m not a big water person to begin with so I always end up with some form of soda or juice or tea with wayy too much sugar. The fact I found a flavor water I actually enjoy that isn’t artificial is amazing and share-able! 
Not only is it delicious but it actually is also very beneficial
 1. Alkalizes the Body
2. Promotes Healing
3. Helps Clear Skin
4. Aids in Digestion
5. Boosts Energy Levels
 Ingredients:
One (1) cucumber, sliced thinly
Juice of one (1) lemon, and sliced if preferred
Filtered water
Mint leaves to taste
Place Sliced cucumber into a pitcher. Pour Lemon juice over top cucumber slices. Slowly pour filtered water to top of pitcher. Add mint leaves (I preferred to stuff mine into a loose tea infuser) and keep the infuser on the side of the pitcher. Put in fridge and sit over night to completely infuse and all the rich goodness is swirled together. 
The next morning, fill a glass to the top with ice and pour the infused water over top the ice. Try to wake up with a nice glass of detox water instead of coffee. It’s a great refreshing feeling!

Tuesday, July 9, 2013

Quick Homemade Green Tea Soy Latte from Teabags

Hello all. I just got back from our Florida/Disney Vacation, so there has been a lack of blogs. Let's just jump right into blogging with a great morning pick-me-up!

Green Tea Latte!
I made mine a soy latte, but you can use regular milk if you'd prefer.

Ingredients:
-Green tea bag
-1/2 cup boiling water
-1 cup vanilla soy milk
- whip cream
-blender
1. Fill a small pot up with 1/2cup water and with the teabag in the water, bring to a boil for about five minutes. You may need to add a little more water in case of rapid evaporation.

2. Heat the milk in another pot but don't boil.

3. Once the tea has finished brewing, pour into a blender, along with the heated milk. I use vanilla soy milk, the vanilla add a nice sweetness to the tea.

4. While still hot, blend together until frothy. You can also add honey, sugar, or vanilla extract. Since I used vanilla soy milk I didn't add anything else. It also is good with melon flavoring.

5. pour into a glass or mug and top with whip cream.


This is a lovely treat, and after spending so much money on vacation, I didn't want to run out to Starbucks. Making this at home is great and so simple!


Enjoy<3

Tuesday, June 25, 2013

Homemade Baked Potato "Chips"


I have been trying to find a good chip recipe for a while now, but I couldn't find one that seemed to work, so I made my own! I'm not saying that this might work for everybody, so you may need to create your own too, but this is how I finally got mine to work.

 I made two different kinds, crunchy chips, and soft potato slices.

for the Potato Slices:
Idaho potatoes
Montreal Steak Seasoning
Olive Oil
Cheddar Cheese

-Preheat your oven to 375F
-Wash your potatoes, you can choose to peel them if you'd like. The skin actually has vitamins and nutrients you don't get with just the potato inside.
-Slice your potato about 1/4in thick
-In a large bowl add the potatoes and mix with the olive oil, and pepper seasonings until nicely coated. You can add other seasonings depending on your taste. I did a batch with chili powder too.
-On a cookie sheet, lay out the slices flat, don't overlap the slices, but they can touch.
-Bake in the oven for 20 minutes without flipping.
-Once finished, place on a paper towel to absorb any left over oil or juice and  immediately add cheese. This gets the cheese nice and melted.


Now for the chips! This one was a bit difficult, but they were delicious.

Idaho Potatoes
Sea Salt
Pepper
Herb Seasonings
Olive Oil


-Preheat Oven to 400
- Slice the potatoes about 1/4in thick or smaller.
- This time, do not mix in a bowl, instead take a paper towel and dip in olive oil. Spread the olive oil over the cookie sheet, you don't want the potato to soak up the oil this time, you just want the potatoes to not stick and have a light olive oil flavor.
- Lay the slices out on the sheet nice and flat
- Sprinkle the salt and pepper and any other seasonings you like.
- Bake for 15 minutes, take out and flip for another 15 minutes
- Once they "brown" they are nice and crispy and ready. No they are not burnt or taste burnt, I just like them extra crunchy.
-Immediately start taking them off the hot sheet and transfer them to a paper towel to cool. The longer you wait, the harder it will be to get the hard chip off the pan.

Enjoy =]

Decorated Makeup Drawer Box: Revamp Your Storage!


As we are getting ready for summer, and summer vacations, It's always fun to clean out everything. I like to clean everything out with each season, instead of just "spring cleaning". I clean my closet and storage beds and move all the furniture and clean out all the drawers in the house. When it came down to my makeup, I REALLY needed some major cleaning. I also wanted to make my box look less tacky and make it match my bedroom more. The room is a pale pine green, pale blue, cream, and dark brown. When I saw the green paper I knew exactly what I was going to do with it! Lets get to it:


 Materials:
Cleaning Supplies (my makeup and makeup box needed cleaning bad!)
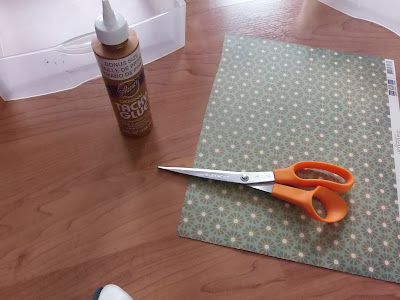
Scissors
Glue
Craft Paper, I used scrapbooking paper
Plastic Drawer Organizer

 Here is a lovely before shot..

Clean EVERYTHING!

 It's always nice to have nice clean things to work with, since you're about to make the box all pretty, your make up should be nice and clean and pretty too!

 Hello my name is Paige and I have a makeup fascination.


 Okay, once everything is clean, lets start making the drawers pretty!

 Cut strips of paper to fit BEHIND-
-The front of the drawer.

  Glue around the edges on the FRONT of the paper so you can glue BEHIND the front of the drawer. Hot glue would have been a lot quicker, just a helpful tip.

 Hold in place until kind of secure.

 Because I wasn't using a quick drying glue, I used some clothes pins to hold the paper in place for the glue to dry

 Do this to the front and the back panels of each drawer

 Now go ahead and start organizing your makeup. I had one drawer for lips- lipstick, gloss, chapstick, lip moisturizer, etc. one drawer for face- blush, foundation, concealer, powders, bronzer. and one for eyes- eyeshadow, eyeliner, mascara, eye gels, eye whatevers.

 and here is the finished one! it looks so much better than what it did, you can still see the glue (it wasn't completely dry yet but I was ready to take pictures!) and all my makeup brushes I put into a different container, which I will post later!

Friday, June 7, 2013

Marinara Spaghetti Squash

Hello blog, it's been awhile.


Today let's take a look at this mysterious squash that seems to have gained a lot of fame lately. Which is awesome because it's delicious.
 You may or may not have seen this in the store, but most people don't even know that it exists. Which is very sad because you can make all kinds of amazing meals from it. The simplest of course, is in it's name. The spaghetti squash is a delicious way to make...Spaghetti! For new SS people, it may not seem so simple as to how to use it, so let's take the easy way shall we? And if you're anything like me, it might just blow your mind. I rarely make noodle spaghetti, and it's my favorite food! I'm just addicted to this squash.

`
 First, pick out a nice plump squash from the store. It shouldn't feel mushy or soft or have any smell really. Actually if you put your nose up to it, it should smell like pumpkin. One moderately sized one feeds my daughter, my fiance, and I for a good dinner and left over night with my recipe. If you want to eat just the inside without adding sauce and meat and other veggies (like we do) then one half of the squash feeds one person well. So make sure you pick one or two squashes that will do for your meal preference.

 Take that nice squash home and wash  the outside of it. You want to do this with just about every produce you get anyway. Now you want to cut the SS in half long ways, or horizontally. This does take some effort and muscle so be careful and use a big sharp knife.


Now that you have it opened, scoop out the seeds like you would a pumpkin.


Be careful not to scoop the actual flesh of the SS, that's the part you need! I find a regular kitchen spoon does the job just fine.


 Now that the middle seeds are all scooped out, you can either toss them or pick them out and roast the seeds. Just like you could any other large squash or pumpkin seeds. add a little seasoning to a cookie sheet and broil them in olive oil until golden brown. They are a delicious before dinner snack!


 Place your two halves of your squash FACE DOWN. Trust me, I've made that mistake before and although some people say it's nice to roast the squash on both sides, if you're baking it. This time we are broiling it and you want the inside of the SS to be nice and toasted and soft. Broil your squash for about 45-50 minutes on a cookie sheet, or until a butter knife can go through the squash without effort.


In the meantime, start cooking up what you're making with the squash. Here I am browning some lean beef, with onions and tomatoes and garlic.


When the SS is done roasting, it will be extremely hot, so let it cool off a bit until you are able to handle it without burning yourself. It doesn't have to be cold, just able to handle it.


While mine is cooling, I drain my meat and add my marinara sauce to the meat/onion/tomato/garlic mix. Add some fresh basil, rosemary, oregano, and sage and let it all simmer together.


 When it has cooled some and can handle your squash, take a fork and start scraping the inside of the inside. The flesh pulls away in strands easily and looks like dun dun dun.. spaghetti noodles! Now that's why this is spaghetti squash! I had a hard time not eating it all right there, it's good just fresh out of the broil and is already packed with flavor. But again, not what I'm doing for this recipe.


You should have lots of "noodles" in one half. sometimes if I'm not using the meat-sauce mixture, I just use the halves as bowels and top them off with chopped tomatoes and seasonings and fresh mozzarella cheese. It's delicious that way too.


Now continuing the recipe, I keep keep getting side tract because of how many amazing way there are to eat this squash!

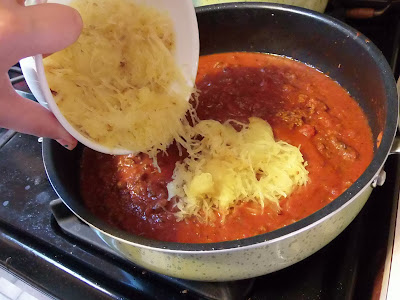
 Scrape out all of the "noodles" an add them to the sauce and mix it up. You can let it simmer a bit to let the squash absorb the flavor or just start serving.


 And now you're done! Serve with some garlic bread and top with your favorite pasta cheese and enjoy!
Trust me, with as many ways to east this squash, and the dozen of recipes you can make with it, you will not be disappointed!