In the midst of preparing for moving, I've been in a very DIY house happy mood. As I was packing up (or more correctly, pulling everything out and thinking about packing up) my craft room things, I found a bunch of old scrap fabrics. Now I always keep my scraps and sometimes feel a bit like a hoarder because I really like recycling my things, especially if it ever cost a pretty penny. That being said, I tried to decide what to do with some scrap fabrics...and with a one year old girl running around with a big pink hat on her head, what better than to make big bows for her head too.
So here is my DIY no-sew bow tutorial, and I am very happy to report how lovely I thought these bows came out.
What You Need (or what I used) :
-Craft glue
-Hot Glue
-Scrap Fabric
-Scissors
-Toothpicks (optional)
Sorry some pictures decided they want to remain sideways
So pick your fabric ...
And cut out a chunk of it. The bigger you cut, the bigger your bow. I live the floppiness of this fabric and thought it would make a neat large floppy bow, so I cut mine larger than the rest I made.
I put some glue into the cap and had a toothpick to smear the glue on the fabric. More accuracy and less globs.
Depending on if you cut a square or a rectangle, you're going to glue down the raw ends. Basically hemming the ends so it has more of a neat finish. I cut this one in a square-ish shape, so I smeared three spots of glue on two opposite edges...
And then folded them over, only about 1cm so its only an edge.
Now both sides have smooth edges
Flip the fabric so the two raw edges are vertical, and find the center between both finished edges that should be horizontal
And add a dab of glue to both sides.
Fold the bottom and place the raw edge on the dabs of glue
Add a little more glue
And do the same to the other raw edge end.
Now you can scrunch the middle and it starts looking like a bow.
Make sure the ugly end (the end with the seams showing) is facing you and make a little pinch fold.
Add a little glue between the fold you pinched.
Pinch and glue a few more and it should hold like a bow now.
Cut a bout 2in long piece of fabric. This goes in the middle.
Now I use my hot glue gun to make sure the middle holds together tightly. Add a dab of hot glue to the center of the bow
And press one edge of the new cut fabric strip onto it.
Wrap it around and around until your out of fabric and hot glue the end.
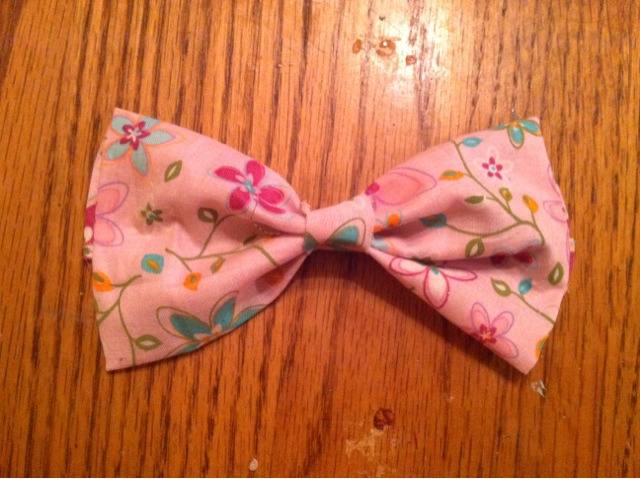
Now you have a bow!
Now if you want to make hair clips, get some plain cheap hair clips. These snap ones I like most when using them for my daughters curly hair.
Open the clip and on both sides add a dab of hot glue
And press it to the bavk /ugly end of the bow. If you opened the clip, it makes this part easier so it sits better.
Once its dry you have a lovely bow. This is my daughter wearing the big bow. She was watching a Disney movie and couldn't be bothered with me taking a picture ;p
I love these little things. I especially like the polka dot ones and use then to hold my hair back while cleaning! Don't think you can ever get old enough to not wear bows. Unless of course you're a guy :-)
~peace and crafting!~


Oh, this is really cute, I love these bows.
ReplyDeleteYou have a really cool blog here. Do you want to follow each other, I would love that.
Tereza
http://drastic-plastic-fantastic-plastic.blogspot.com/